Setting Trait and Marker Targets
Traits and Markers both provide histograms to represent the predicted outcomes in the progeny. They also share the same mechanism to control these histograms to achieve your desired outcomes.
After clicking a histogram, you will be presented with the expanded view of the histogram:
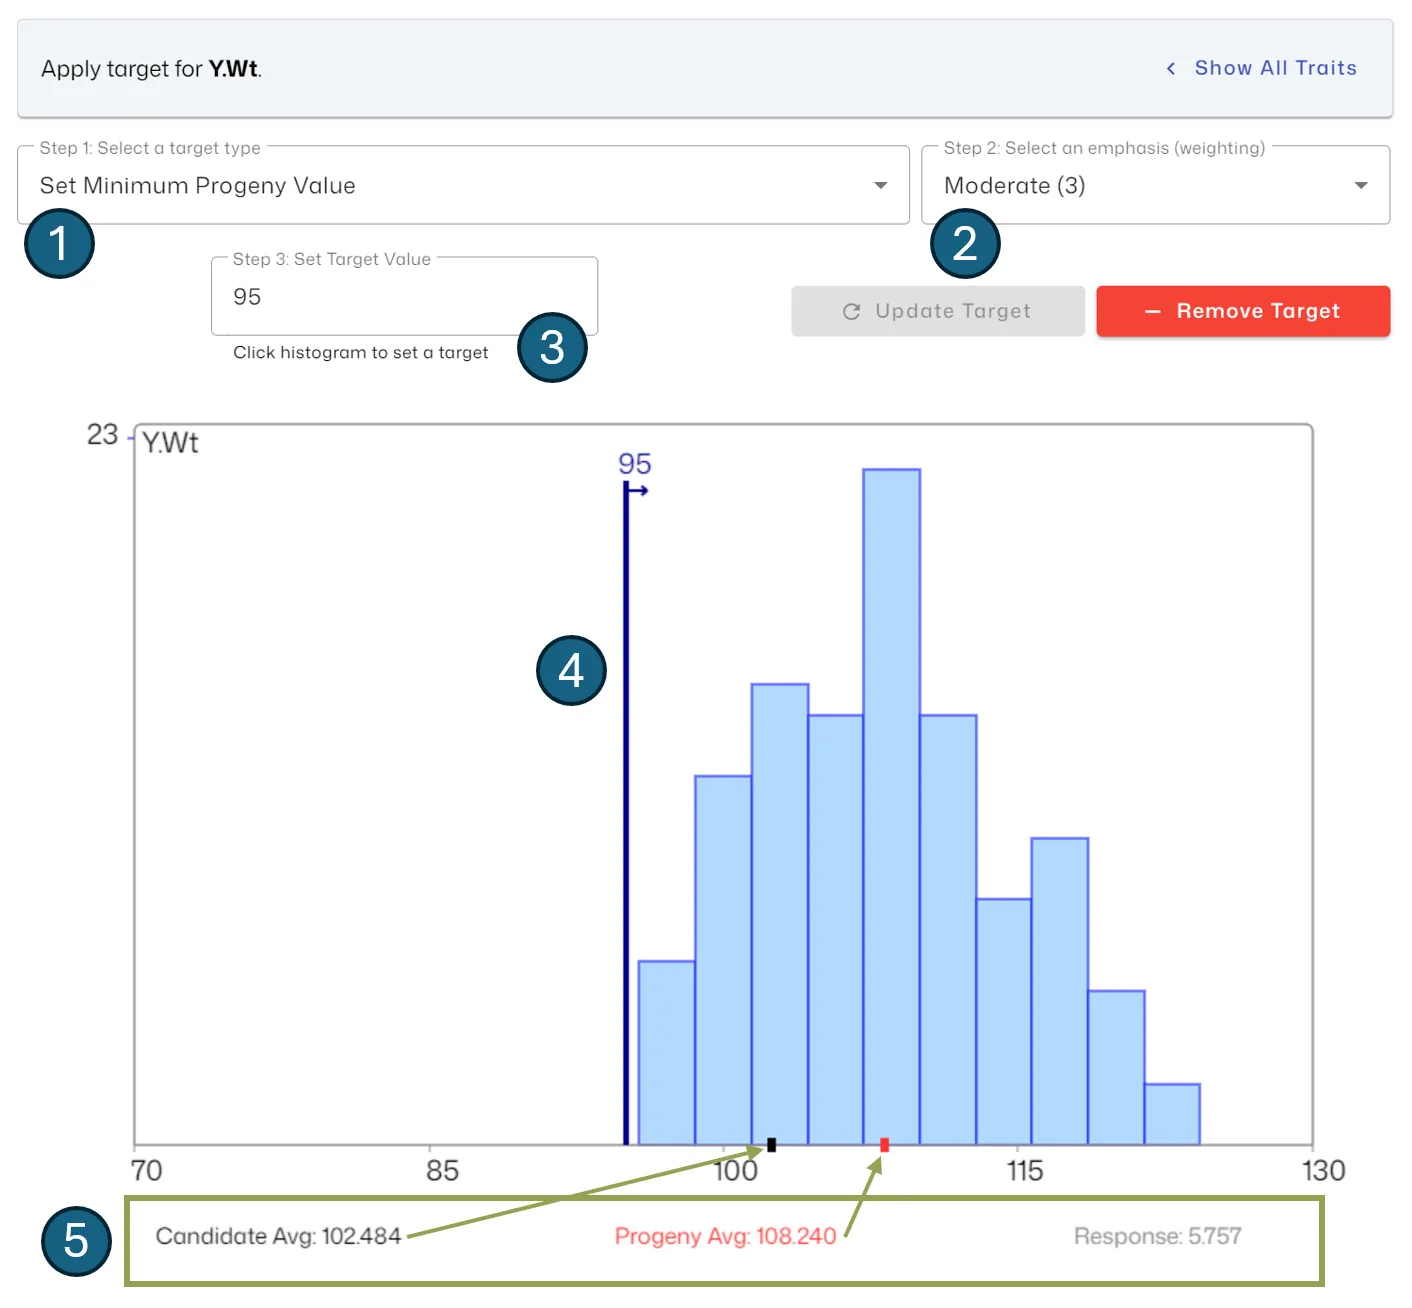
Below is a description of the 5 elements highlighted:
- Select a target type. Each option is further described below under “Target types for manipulating histograms”.
- Select an Emphasis. Please see the section below for advice on selecting an Emphasis.
- Set a target value. Some (not all) target types require you to specify a target value. You can either enter a value into the text box and hit the <Enter> key OR click the histogram to set a target. When all required fields are supplied, you can click the “Apply Target” or “Update Target” button to invoke your new target.
- The histogram shows target values as vertical lines and other control types used are shown in text (“M” and “V” for Mean and Variance) to remind what you have chosen. These lines and text will be shown in blue when the target is invoked, otherwise grey. The invoke feature is supplied so that you can keep your settings but switch them off as desired for testing. Warning: If you click on a histogram, you will change the position of any target values (vertical lines) on the graph. So, if you have carefully chosen these values, take care not to click on the histogram and loose that information!
- The black and red ticks
- Black tick: The sex-balanced candidate average value for the trait/marker being displayed. This should remain fixed for the duration of your run. The black tick also accommodates candidates only represented in Committed Matings.
- Red tick: The Progeny Average value for the current solution. This will change as your targets change and as the solution evolves.
When you are finished, you can go back to viewing all traits/markers by clicking the “Show All” button at the top-right of screen.
Selecting an Emphasis and Target Value
Section titled “Selecting an Emphasis and Target Value”The extent to which your desired outcome is met depends on:
- The Emphasis that you impose for each target
- How ambitious your target values are for each target (that requires a target value)
- The candidates you have available (their performance and marker data)
Achieving exactly the outcome that you want for an item may cause too much compromise in other factors (Traits, Markers, Index, Coancestry, Progeny Inbreeding). For example, some traits are antagonistic with each other so you might find that applying a desirable target to one trait leads to an undesirable outcome for another trait. So you may have to play the balancing game for a while.
Supported Target Types
Section titled “Supported Target Types”| Target Type | Description |
|---|---|
| Set Minimum Progeny Value | Encourage progeny to have a value above your chosen target |
| Set Maximum Progeny Value | Encourage progeny to have a value below your chosen target |
| Average Progeny Value - Set Target | Aim to maintain a certain Average Progeny Value. |
| Average Progeny Value - Increase | Aim to increase Average Progeny Value (No target value required). |
| Average Progeny Value - Decrease | Aim to decrease Average Progeny Value (No target value required). |
| Progeny Variation - Increase | Aim to increase Progeny Variation (No target value required). |
| Progeny Variation - Decrease | Aim to decrease Progeny Variation (No target value required). |
Applying multiple targets to a single trait/marker
Section titled “Applying multiple targets to a single trait/marker”More complex manipulations than those provided by these Target Types can be achieved for traits and markers by replicating fields in the main data file so that you have two or more Histograms to work with for each single trait or marker.
For example, you might have “EyeMuscleArea1” and “EyeMuscleArea2” with identical values in your data file where you “Set Minimum Progeny Value” to “EyeMuscleArea1” and “Average Progeny Value - Increase” to “EyeMuscleArea1”. This would ensure you have no progeny below a certain EyeMuscleArea value AND you are increasing EyeMuscleArea on average.